Power Puff Go! Page Process
Because I've been asked about my coloring process before, I thought I would lend some insight to you folks who enjoy using linework and flat color...
click any image to enlarge
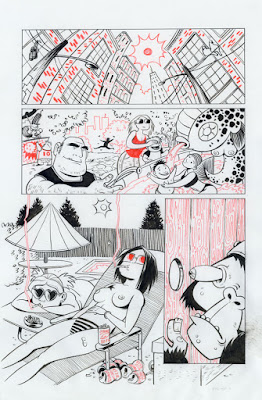
Above is a scan of my original line art. I use black and red ink, so I can more easily separate out the line.


I then use the selective color palette to change the red line work to magenta, make the white pure white and the black pure black. I will usually need to repeat this step four or five times to make sure the line work has been converted to pure colors. (It is imprtant to do this when your document is in CMYK mode)


After I have my pure colors, I use the channel mixer to separate out the magenta and black line work. I then have 2 documents that I convert to pure black lines by making the document a bitmapped document...

black

magenta

I paste both documents into my template before I resize them (I select both layers and scale them down, as I do my inks at about 200% of final size). I still will use the pencil tool to color linework on the black and magenta layers, but doing the inks in two colors makes separating out those lines easier. The white on both of those line layers has been deleted and the lines filled with black/magenta by the paint bucket tool.
I use a 50% grey background so it is easier to see what lines I am coloring. I will often change those colors later, right now I'm concerned with getting all of the colors seperated out.

Above is the the coloring in progress. I use the pencil tool to fill out my flats because it makes for a harder edge than any paintbrush tool.

Above is the final art with tones and basic gradients added in.

And finally, the letters...
You can read Power Puff Go! at drunkduck.com.

Above is a scan of my original line art. I use black and red ink, so I can more easily separate out the line.


I then use the selective color palette to change the red line work to magenta, make the white pure white and the black pure black. I will usually need to repeat this step four or five times to make sure the line work has been converted to pure colors. (It is imprtant to do this when your document is in CMYK mode)


After I have my pure colors, I use the channel mixer to separate out the magenta and black line work. I then have 2 documents that I convert to pure black lines by making the document a bitmapped document...


I paste both documents into my template before I resize them (I select both layers and scale them down, as I do my inks at about 200% of final size). I still will use the pencil tool to color linework on the black and magenta layers, but doing the inks in two colors makes separating out those lines easier. The white on both of those line layers has been deleted and the lines filled with black/magenta by the paint bucket tool.
I use a 50% grey background so it is easier to see what lines I am coloring. I will often change those colors later, right now I'm concerned with getting all of the colors seperated out.

Above is the the coloring in progress. I use the pencil tool to fill out my flats because it makes for a harder edge than any paintbrush tool.
Above is the final art with tones and basic gradients added in.

And finally, the letters...
You can read Power Puff Go! at drunkduck.com.
wow this is so helpful!! Thanks for sharing, beautiful illustrations!
ReplyDeleteAwesome process, thanks for sharing!
ReplyDeleteThanks guys! Glad this could be useful :)
ReplyDeleteinspiring!
ReplyDeletelove the style.. following you now :)
ReplyDeletehow would you describe the art style for the page
ReplyDeleteI find your two-color linework method very interesting.
ReplyDelete